Deviation Actions
About a year ago, a friend and I set out to make SFM look like Blender, by using technologies already available in the Source Engine. Our findings will be split into two tutorials—this first one covering shininess using phong and envmaps, and the second dealing with refraction. These were made with intermediate-level users in mind, so knowledge of VTFedit and texture modification will be assumed. If you’re just getting started with texturing for Source, check this short video: https://youtu.be/6BBq-bQJCHs
All said, this is going to be fairly long, so let’s get into it.
To start, the Nightmare Moon example I give uses a lot of screenshots, so for those who want to copy & paste my parameters to play with them, I’ll be providing the plain text for the VMT here:
//NEW TEXTURE BEGINS
$basetexture "models/vn_mlp/solar_empire_armor/white"
//YOU WILL HAVE TO CHANGE THIS
$color2 "{14 0 14 255}"
//PHONG BEGINS
"$phong" "1"
"$phongalbedotint" "1"
"$phongexponent" "60"
"$phongboost" "2"
"$basemapalphaphongmask" "1"
"$phongfresnelranges" "[0.5 6 10]"
"$phongtint" "[20 15 40]"
//ENVMAP BEGINS
// "$envmap" "env_cubemap"
"$envmap" "environment maps/rg"
"$envmaptint" "[0.25 0.2 0.3]"
"$normalmapalphaenvmapmask" 1
// "$envmapsaturation" "0"
//RIMLIGHT BEGINS
"$rimlight" "0.5"
"$rimlightexponent" "2"
"$rimlightboost" ".4"
//ESOTERIC STUFF BEGINS
"$ambientocclusion" "1"
"$cloakPassEnabled" "1"
"$ssbump" "1"
"$SSBumpMathFix" "1"
$model "1"
$nocull "1"
§1 - WHAT DOES ALL THIS MEAN?
Texture effects are layered, in a manner of speaking. The basetexture, bumpmap, phong, and envmap all work together to create the shine™. Let’s break them down.
$basetexture
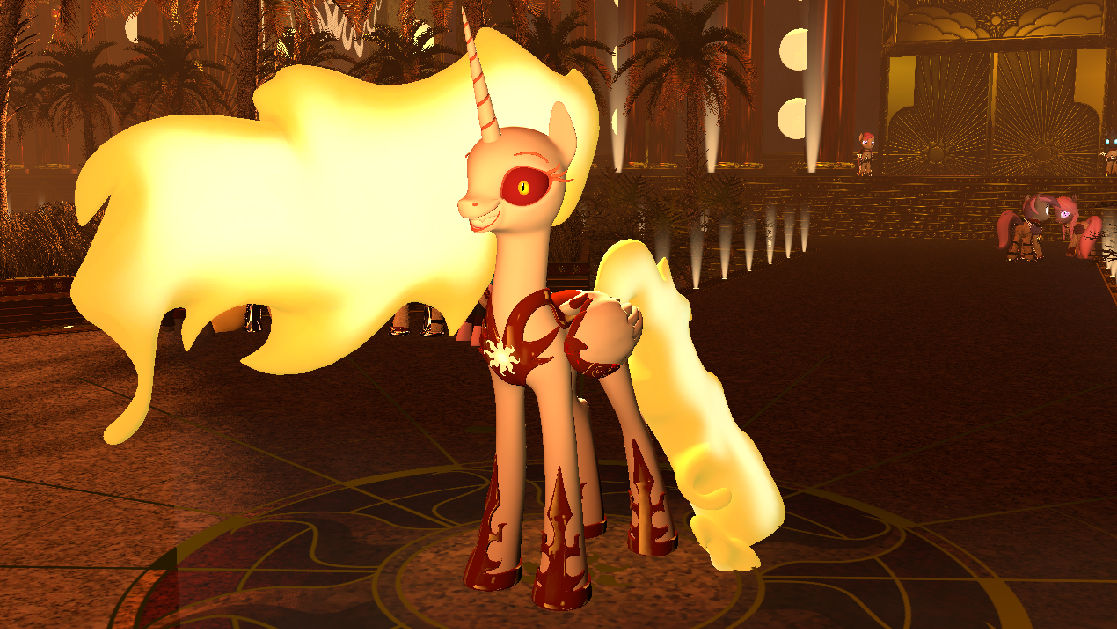
If you’re reading this, you should already be familiar with your basetexture. Below, you can see Daybreaker’s default appearance minus all effects. Things to note: the brightness of the basetexture affects how strongly the other effects come through. The darker the base texture, the more strongly the phong and env effects appear when the model is lit.
$bumpmap
(Basetexture+bumpmap)
Bumpmaps add detail to a texture by adding false ‘depth’ that casts shadows as if it were part of the model. Modellers take note, bumpmaps are MUCH cheaper than adding extra polygons.
Valve Developer Wiki’s article on bumpmaps: https://developer.valvesoftware.com/wiki/$bumpmap

$phong and ambient occlusion
Phong causes the model to reflect light that is either part of the map, or placed by you in SFM. Tied to phong is the model’s Ambient Occlusion, which creates artificial shadows wherever models, or parts of models, come close together. For whatever reason, AO will not render without phong.

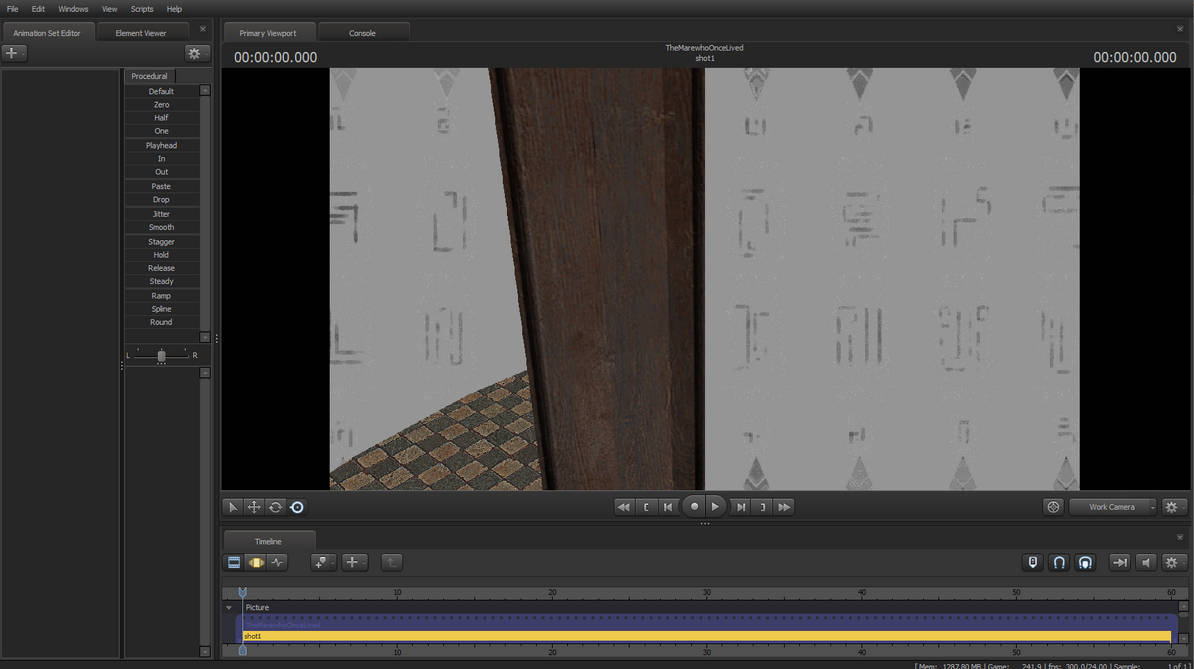
$ssbump / self-shadowing Ambient Occlusion
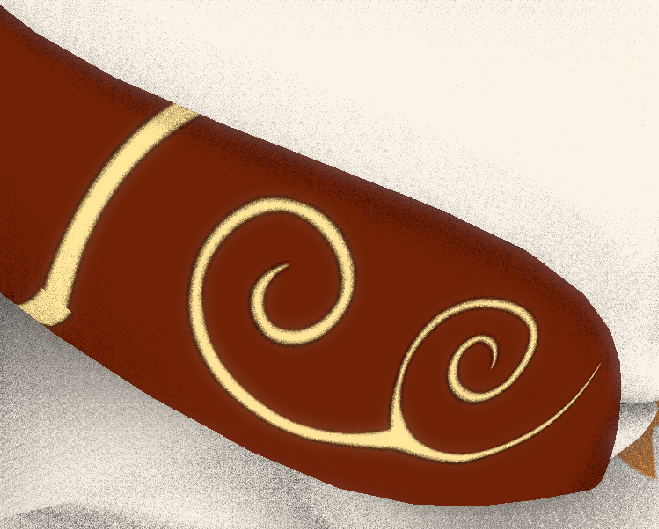
Phong, envmaps, and ambient occlusion all interact with your texture’s bumpmap. Here, you can see the AO darkening the edges around the wing’s filigree.
$envmap
(Basetexture+Envmap)
The reason we’re all here, and the most complicated of these effects to explain. If phong is created by lights in the level, then your envmap is created by the level itself. In a word, envmaps are reflections. They are cube-shaped textures (known as cubemaps) streeetched across the surface of your basetexture.
In practical terms, they add an additional layer of sheen to your model that acts independent of lighting, mostly. The brighter your basetexture is lit, the less pronounced the effect will be. This is useful, as it can be a less resource intensive way of lighting parts of a scene or model without actually using that many lights [Example].
You have two main options when using an envmap. Env_cubemap uses pre-rendered cubemaps of the level to add an accurate reflection to the model, with the perspective of the reflection starting where the env_cubemap entity has been placed. [Example] This is the hard way of doing things, as it requires you to know how to use Valve’s hammer editor, and deal with porting your mapfile back and forth between Alien Swarm for it to work. Worst of all, if you’re a scenebuilder, then you’re SOL, as cubemaps CANNOT be created with props you’ve placed in SFM. It looks nice when it works, but it is often more trouble than it is worth. The reflections in the demonstration scene with Daybreaker were NOT made with this method. If you are a mapper, check this tutorial - https://youtu.be/C6Zawe7e9BE?t=111.
So, what’s the alternative? Well, in your \game\hl2\materials\environment maps folder (or similar folder for other games), there are pre-made cubemaps that can usually be applied to your textures. My favorite is rg, and this is the map I’ve used for Daybreaker. The rest of the environment uses klab 01. These are ready-to-use, and will appear regardless of whether the map you’re using has cubemaps.
§2 Cool! How do I do this?
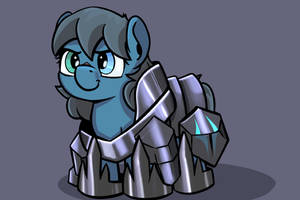
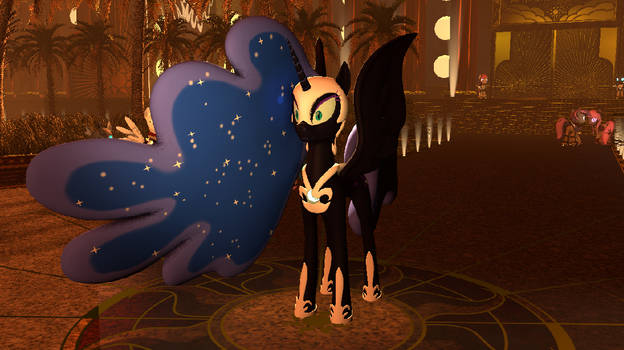
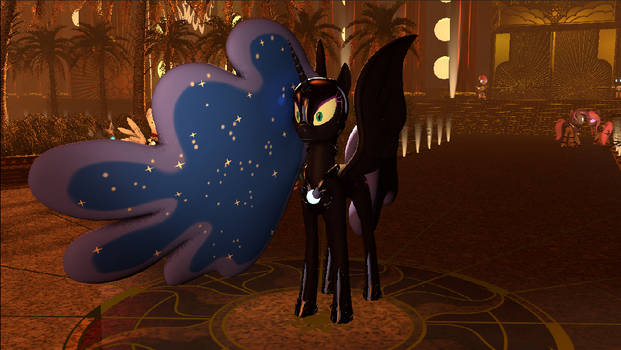
As a demonstration, I’ll bring you with me as I apply these effects to the nifty Nightmare Moon model made by Sindroom. Take a look at it, because I sort of forgot to take a screencap of what the model looked like before I started messing with it.
Notes:
“//” in front of a line in VTFedit means that line is not being used by the program. So ignore any commented (//)’d lines in my screencaps until we get to them :)
Using “mat_reloadallmaterials” in the SFM command console “`” allows you to refresh your textures without restarting SFM.
VMT parameters are universal, so pasting in what I have will immediately apply the effect as long as you define a white basetexture of your own.
STEP ONE: BASETEXTURE
The armor on Sindroom’s model is nice, because it is just one solid color, which means there’s a super-easy way to modify it. If you replace the basetexture with one that’s a solid white, you can use the $color2 parameter to manually alter how it looks without needing to constantly re-import new textures.
Below, you can see my VMT and how it looks in-engine:

STEP 2: $color2
$color2 uses a standard RGBA color array {0-255 0-255 0-255 0-255}, the first number being the amount of red, second green, and third blue. The fourth number is the “alpha” or the transparency of the color applied. Numbers less than 255 will cause the color to blend with the color of the basetexture. You can get the RGB array of any color you want by using the dropper tool in more or less any image editing software. When you get the array, plug it in to the color2. In my case, I want the armor to be nearly pitch-black, with a slight purple hue. So my array will be: {14 0 14 255}.


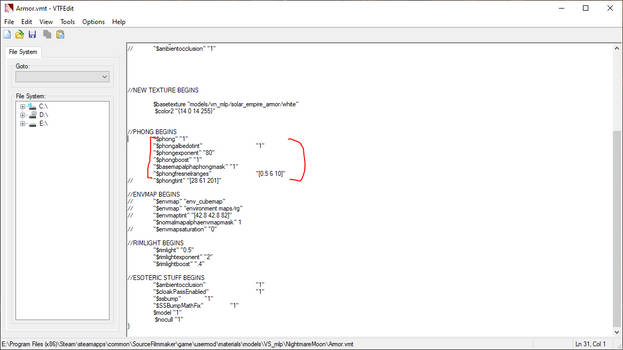
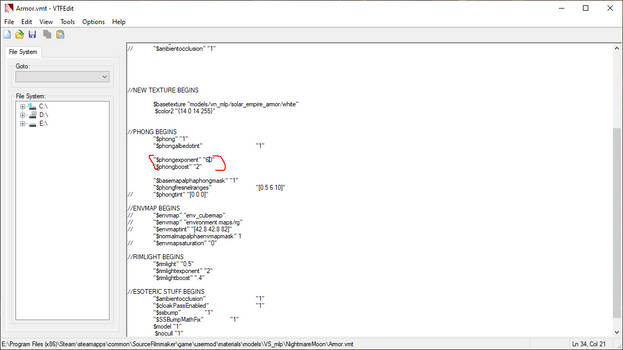
STEP 3: $phong, part 1
There’s a lot going on here, so we’ll break the lines down one at a time:
$phong - activates the effect
$phongalbedotint - the color of the $basetexture is blended with the light hitting the model
$phongexponent - (any positive number) controls how ‘large’ the sheen is. We’ll modify this in part 2, but for now, know that larger numbers create a narrower sheen.
$phongboost - (any positive number) controls how bright the sheen is.
$basemapalphaphongmask - I’ll cover this in the advanced section. All you need to know for now is that this parameter is needed for the phong to appear when you’re using an envmap.
$phongfresnelranges - [X Y Z], controls what angles the sheen will appear, and when they’ll vanish. Getting a good setting here is pure trial and error.
$phongtint - [R G B], uses a color array, like the color2 parameter. This tints the color of the reflected light, allowing for some cool effects.

STEP 3: $phong, part 2
Here, we’re just making the phong a bit stronger, by widening the sheen by lowering the number used for the $phongexponent and increasing the $phongboost. Fun trick: if you want AO, but no phong, you can set your phongboost to 0.

STEP 4: $envmap
At last, we come to the fun part. As before, there are a lot of parameters we’ll be modifying:
$envmap “file path”, just like you’d path to any other texture in Source. The texture you place here will be the one stretched over your model. It must be a six-sided texture, or it will not appear on your model. Using the path “env_cubemap” causes your model to receive pre-baked reflections from the map you’re using, if applicable.
$envmaptint [# # #], what color your cubemap is tinted. This parameter is strange, as it uses the same RGB format, but the numbers are proportional to one another when using an envmap with phong. Think of it as mixing physical paints. In the example, I’m using a quarter part red (0.25), a fifth part green, and about a third part blue. The remainder is subtracted from the brightness, creating a duller sheen. Or, in other words, the larger one value is in proportion to another, the more strongly saturated the color would be. (1 0 0) would be the same as 255 red.
$normalmapalphaenvmapmask - once again, another parameter required to get these effects to play nice with each other. We’ll cover this further in the advanced section.

STEP 5 - Esoteric Stuff
These are a few extra commands that have various applications. They’re mostly optional.


$ambientocclusion - enables ambient occlusion, but it doesn’t seem to do much? Messing with this parameter has inconclusive results. Recommendation: leave it on.
$cloakpassenabled - has some semi-perceptible effect with how light interacts with the model. Leave it alone.
$ssbump - causes your bumpmap to be self-shadowing.
$ssbumpmathfix - refines the bumpmap shadows a bit.
$model - mostly unnecessary. Tells the engine that this texture is meant for a model.
$nocull - causes textures to render their reverse faces. In plain english: you know how if you fly inside a model, it’s invisible? This causes the texture to also be drawn inside the model. Useful for translucent textures, or textures that normally only have one face. For optimization’s sake, you can usually leave this set to 0.
And we’re done!
Assuming you’re working with solid color textures, this is all you’ll need to know. But, if your texture has more than one part, things get kind of… advanced.
§3 Advanced Shine Overview
If you want to make it so some parts of a texture are shiny, and other parts are not, you’re going to have to learn to use the alpha channel.
So, what’s that? The alpha channel is an extra layer of information saved into a texture’s image, allowing the engine to apply special effects to specific regions (with specific intensities) to parts of a texture. As an example, the alpha channel can be used to define how reflective parts of a texture are (including them not being reflective at all), or how brightly a part of the texture will glow when using the $selfillum parameter, or which parts will be transparent when using $transluscent, $alpha, or $alphatest.
You are also allowed two alpha channels per given material, one in the $basetexture and one in the $bumpmap. So, you can use one channel to define reflection, while the other defines glow. However, there are still some limitations to this, and most effects will use the $basetexture by default.
§4 How do I create an alpha channel?
It’s actually pretty straightforward. For photoshop users (everyone else, Google and Youtube are your friends), you just need to navigate to your ‘channels’ tab and create a new ‘layer.’ Shown below:

Once you have the channel, create a black-and-white image that defines the regions you want to apply an effect to. Pictured here is my retexture of the Pony Commissar model. I want the yellow parts of the uniform to be shiny, so I’ll make a layer with the yellow parts set to white, with the rest of the image 255 black, so no other parts of the model have even the slightest shine.
Rule to remember: the closer to full white, the stronger the effect. 100% white is the effect at maximum, 100% is the effect disabled. This goes for shine and selfillum.

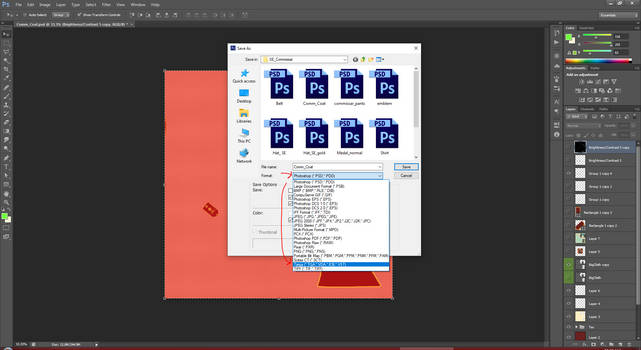
Once you have the regions you want painted, merge the black and white parts into one layer. With the selection tool, if you use CTRL+A, you can select the contents of the entire layer, allowing you to CTRL+C and copy its contents. Then, tab over to your alpha channel, and press CTRL+V to paste it in. Toggling the alpha channel will show the black regions with a red onion skin. Once you’re sure everything lines up, you can export the texture (remember to make sure your colored layer is visible!)
Choose “Targa” as your file format, and make sure to select 32 bits/pixel when prompted.

From there, you can import your texture into VTF edit as per usual.
§5 The Normal Alpha Channel
If you’re a mapper, or need a second channel, you’ll need to save your alpha information to your bumpmap as well. Unfortunately, VTFedit deletes the alpha channel when generating a normal map. You can get around this by first creating your normal map, exporting it from VTFedit, then placing the resulting image into photoshop.
Line everything up as usual, save as a targa, then reimport it to VTFedit without generating a normal map.
This is mandatory, if you’re using a bumpmap and envmap on a brush texture in Hammer. Otherwise, things get weird…
§6 Alpha Parameters (revisiting $basemapalphaphongmask and $normalmapalphaenvmapmask)
If you’ve followed along so far, you can probably guess what these parameters do. $basemapalphaphongmask tells SFM to use your $basetexture’s alpha channel when determining phong intensity. $normalmapalphaenvmapmask uses your bumpmap’s alpha channel to determine env intensity.
Clever readers will probably be thinking: WOAH! I can use phong in one spot, and env in another! Unfortunately, this does not work. Now, I must reveal my hand and admit that you’re not actually supposed to combine phong with envmaps. BUT WE’RE GOING TO DO IT ANYWAY.
How to make them work:
Here’s what my shiny Solar Empire soldier armor’s helmet VMT looks like:
"$basetexture" "models/vn_mlp/solar_empire_armor/helm"
"$bumpmap" "models/vn_mlp/solar_empire_armor/helm_n"
$model "1"
$nocull "1"
$color2 "{46 26 0 255}"
"$phongexponent" "80"
"$phongboost" "1"
"$phongfresnelranges" "[0.5 6 10]"
"$phongtint" "[189 91 48]"
"$envmaptint" "[2.6 .80 .40]"
"$envmapsaturation" "1"
"$rimlight" "0.5"
"$rimlightexponent" "2"
"$rimlightboost" ".4"
"$normalmapalphaenvmapmask" 1
"$selfillum" "1"
"$envmap" "environment maps/rg"
"$ambientocclusion" "1"
"$cloakPassEnabled" "1"
"$ssbump" "1"
"$SSBumpMathFix" "1"
// "$basemapalphaphongmask" "1"
"$phong" "1"
"$phongalbedotint"
You’ll notice I’ve disabled my basemapalphaphongmask. You MUST get rid of this line, and use only $normalmapalphaenvmapmask. For whatever reason, the phong and env will be constrained to the area defined in the bumbpmap’s alpha channel.
But wait! That means we can still do something with the $basetexture’s alpha channel!

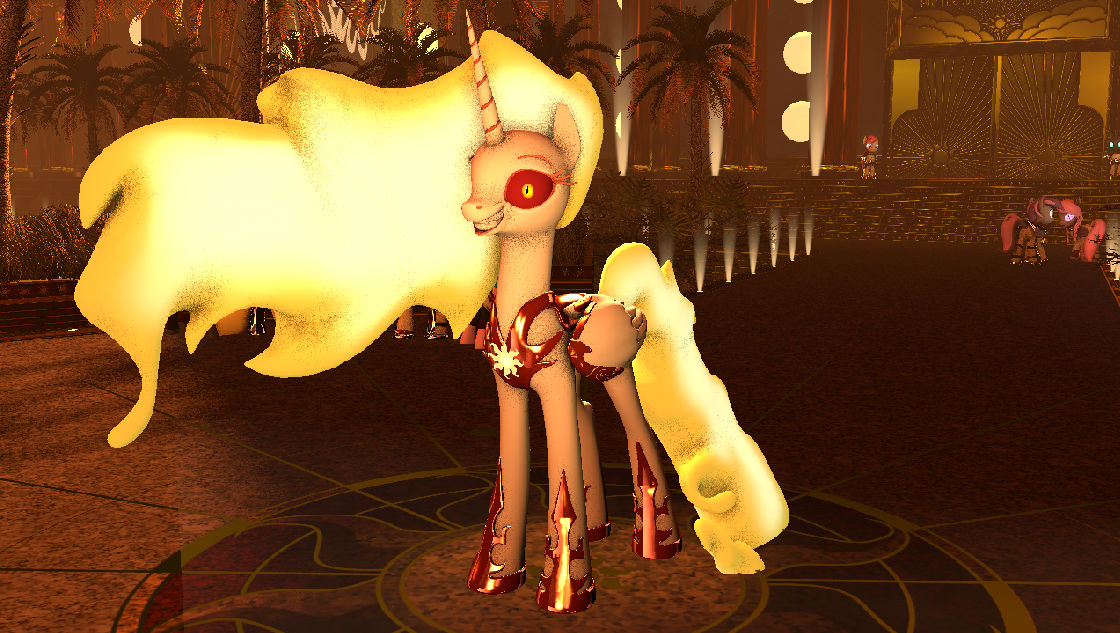
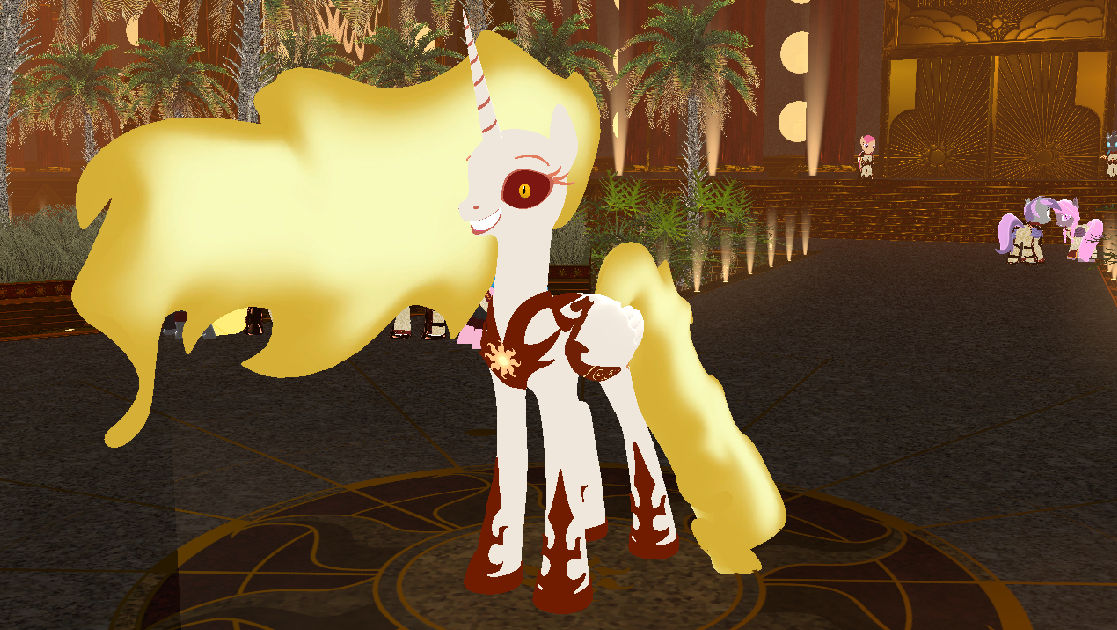
For those familiar with the displayed textures, Daybreaker’s helmet and the Royal Guard’s helmet are both one texture, yet you can see phong on the yellow parts, but not the env!
This is achieved with $selfillum
The envmap effect is reduced in proportion to the brightness of the selfillum. So an area that is completely self-illuminated will have NO envmap effect, but will still have a phong effect. Woah! You can see that I’ve done this to allow Daybreaker’s helmet to be mostly red with its envmap, but still shiny with its phong on the yellow parts.
This is achieved by using the basetexture’s alpha channel to define the selfillum, and the bumpmap’s alpha defining the whole helmet as reflective. Of course, the yellow area also glows because of the selfillum, but so does the rest of the model if you’re using the rg cubemap. It tends to sort itself out once you light your scene.
§7 In conclusion & additional resources
So yeah, that’s how my shiny stuff works. A lot of it is kinda hacky, which is to be expected with an engine as old as Source. Hopefully you’ll find a use for the stuff I’ve shown here. Now go forth! Create!
-Wintergleam
Valve Developer Wiki
https://developer.valvesoftware.com/wiki/Main_Page
If you’re curious about any parameter mentioned, try searching for it here
Phong with Override Materials
How to get cubemaps into an SFM map
My Gold Parameters:
$color2 "{46 26 0 255}"
"$phongexponent" "80"
"$phongboost" "1"
"$phongfresnelranges" "[0.5 6 10]"
"$phongtint" "[65 42 6]"
"$envmaptint" "[1.6 .60 0]"
"$envmapsaturation" "1"
"$envmap" "environment maps/rg"