ShopDreamUp AI ArtDreamUp
Deviation Actions


Suggested Deviants


![Outland Inn - wild winter [day-grid]](https://images-wixmp-ed30a86b8c4ca887773594c2.wixmp.com/f/b4b868d6-b2d6-4489-9781-a2612af4fb5c/de8td58-7cb3853c-6ba2-490c-a5c8-d2922fbd77dd.png/v1/crop/w_184,h_184,x_0,y_22,scl_0.10430839002268,q_70,strp/outland_inn___wild_winter__day_grid__by_sirinkman_de8td58-92s-2x.jpg?token=eyJ0eXAiOiJKV1QiLCJhbGciOiJIUzI1NiJ9.eyJzdWIiOiJ1cm46YXBwOjdlMGQxODg5ODIyNjQzNzNhNWYwZDQxNWVhMGQyNmUwIiwiaXNzIjoidXJuOmFwcDo3ZTBkMTg4OTgyMjY0MzczYTVmMGQ0MTVlYTBkMjZlMCIsIm9iaiI6W1t7ImhlaWdodCI6Ijw9MjU5OSIsInBhdGgiOiJcL2ZcL2I0Yjg2OGQ2LWIyZDYtNDQ4OS05NzgxLWEyNjEyYWY0ZmI1Y1wvZGU4dGQ1OC03Y2IzODUzYy02YmEyLTQ5MGMtYTVjOC1kMjkyMmZiZDc3ZGQucG5nIiwid2lkdGgiOiI8PTE3NjQifV1dLCJhdWQiOlsidXJuOnNlcnZpY2U6aW1hZ2Uub3BlcmF0aW9ucyJdfQ.LAc4qpl7XHYix1MwhbnNMMbIyz7b-87roPNojptBrto)
![Outland Inn - wild winter [day-grid]](https://images-wixmp-ed30a86b8c4ca887773594c2.wixmp.com/f/b4b868d6-b2d6-4489-9781-a2612af4fb5c/de8td58-7cb3853c-6ba2-490c-a5c8-d2922fbd77dd.png/v1/crop/w_92,h_92,x_0,y_11,scl_0.052154195011338,q_70,strp/outland_inn___wild_winter__day_grid__by_sirinkman_de8td58-92s.jpg?token=eyJ0eXAiOiJKV1QiLCJhbGciOiJIUzI1NiJ9.eyJzdWIiOiJ1cm46YXBwOjdlMGQxODg5ODIyNjQzNzNhNWYwZDQxNWVhMGQyNmUwIiwiaXNzIjoidXJuOmFwcDo3ZTBkMTg4OTgyMjY0MzczYTVmMGQ0MTVlYTBkMjZlMCIsIm9iaiI6W1t7ImhlaWdodCI6Ijw9MjU5OSIsInBhdGgiOiJcL2ZcL2I0Yjg2OGQ2LWIyZDYtNDQ4OS05NzgxLWEyNjEyYWY0ZmI1Y1wvZGU4dGQ1OC03Y2IzODUzYy02YmEyLTQ5MGMtYTVjOC1kMjkyMmZiZDc3ZGQucG5nIiwid2lkdGgiOiI8PTE3NjQifV1dLCJhdWQiOlsidXJuOnNlcnZpY2U6aW1hZ2Uub3BlcmF0aW9ucyJdfQ.LAc4qpl7XHYix1MwhbnNMMbIyz7b-87roPNojptBrto)
Suggested Collections


You Might Like…


Featured in Groups


Description
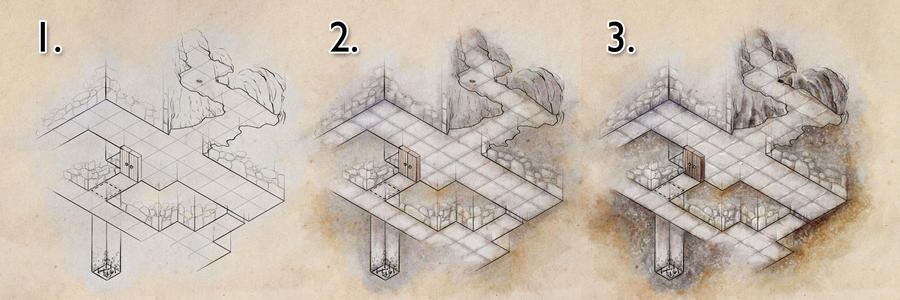
How to colour a dungeon map by hand
Today it's back to the isometric dungeon I created in this mini-tute a few weeks ago ([link]). +Larry Moore was asking about the next step - how I'd go about taking a map like that and colouring it up. An isometric map is a little trickier than a top down map. As there aren't hard edges for the walls it's tricky to set up a selection and stroke the selection or use filters to define walls and floor styles. So I do it by hand. And here's the steps I use.
Note - I'm refering to Photoshop in this tutorial, but it's exactly the same in Gimp.
1. Throw a nice textured background under your lines. I'm very partial to parchment backgrounds, but stone, cloth or other backgrounds also work well. The texture will pull the whole map together and suggest more detail than you put in by hand. Then create a new layer with the colour blend mode underneath the lines. Take a very desaturated colour (I tend to use a brown that's almost grey, maybe 5% saturation) and block in areas that should be stone. I use a grungy brush with low opacity and build up the greys slowly. You don't want heavy round brush edges here. They may not show up at this stage, but you'll notice hard edges on the colour layer towards the end. Finally, pick out the colours of non grey objects, like wooden doors and water. Don't worry about being too careful here. You'll almost certainly go back and edit this layer before you're done.
2. Add in your first layer of light and shade. I almost always use an overlay layer for light and shade. At this stage, your building up general form, so use a large brush - around the same size as a grid square. A fuzzy circular brush works well, or a grungy brush with low opacity. I like to make the floor the lightest area, as our eyes are drawn to the lightest point in an image. The walls and floors around the dungeon can be darker to suggest heavy earth and rock. I also like to darken the corner where the wall meets the floor. There's no good reason for that physically, but is really seems to work for me when detailing maps. In this case I've actually built up two overlay layers to get to here - this is mostly because my background was so light.
3. Place the detail. This is the stage that takes the time. Once again, add a new overlay layer. Reduce the size of your grungy brush by half (at least) and start working in the darkest shadows. These should be along wall edges, and in nooks and crannies of natural stone walls. I also ran a dark brush along all of the flagstone lines to give a bit of dimension to the flagstones. Now switch to a light colour, amd use a hard round brush with relatively small size and set the opacity to pressure sensitivity (if you're using a tablet). Pick out sharp highlights. These should be along the any sharp edges, like the side of an outcropping, the edge of a flagstone, the edge of a door, the bright highlight on a doorhandle. I also added the stone effect in the surrounding earth by setting the hard brush to low opacity, adding a large scatter and allowing the size of the brush to vary. I threw in some scatter in the earth to hint at rocks and stones in the earth around the dungeon.
Now go back to your colour layer and make any tweaks you need now that the detailing's finished and you're done!
That's another long one (I'm afraid), but the steps are - lay in the colours, block in the rough light and shade, add in the detailed shadows and highlights. I hope that helps! You can find the psd for the iso dungeon here - [link] - feel free to play with the different layers and see what they do.
As always, previous tips can be found on my blog here: [link] Feel free to reshare, and let me know if there's anything that doesn't make sense.
#fmtips #map #tutorial #photoshop
Image size
4500x1500px 1.18 MB
© 2012 - 2024 torstan
Comments17
Join the community to add your comment. Already a deviant? Log In
Great tips. Most links are not working now (