
Deviation Actions


Description
I am almost near finishing my first pilot episode of the comic book i wrote, i had the urge to present some main characters. I will soon write more info on the comic and how it's publication is going. Project is named Project: Antharra and it is a galaxy in work for the past 14 years. And it is time for me to get it to you. I really hope you will like it!
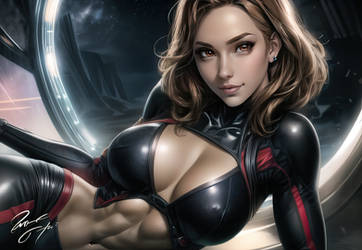
Irina Skarowski, weapon and vehicle specialist, born in the year of 3289, from blue collar parents in European State of North France. She was 24 when she sign up to the short list of military personnel for the "New Hope" mission. She was in the 2nd Aeronautical Engineering Division as part of the team of people in charge of weapons development. While she strives for new world to live on, she never admits herself that she regret leaving Mother Earth, her family and friends. This voyage is biggest accomplishment of human civilization, and she believes in it. If there is a slightest chance for humans to survive, she wants to be part of it.
Project: Antharra
by Skaven Zverov
Follow Antharra and me on:
www.adamisailovic.com/
www.facebook.com/projectanthar…
-------------------------------------------------------------------------------------------------------------------------------------------------------------
vfxserbia.com/2014/07/07/irina…
Link To Steps: fc06.deviantart.net/fs70/f/201…
I have added a tutorial, hope you will like it!
Few people asked for tutorial, so, here it is ( pardon my bad english ):
Hello everyone! This is my first tutorial and I hope that you will like it. The idea behind this work is to try the technique Ambient Occlusion on the 2D image to get a 3D effect as much as possible. Character is from personal project called Project: Antharra and I chose one of the three human characters from my upcoming comic: "New Hope." Tutorial image you can download for the sake of a higher resolution, and steps will specify the numbers marked on the individual images.
But let's start:
1 There is not much to say, sketch. I put her in a flight suit, and whicle sketching I was thinking about materializing, forms, dynamics and practicality. I wanted to make an aggressive design masks and remotely comfortable looking clothing. Also, I thought about the coverage of the skin, because I did not want to look naked with a pair of leather straps.
2 Rendering the skin starts, for me the hardest part. During this step, I took care of the basic rule Ambient Occlusion times, to pay attention and to draw the parts where the light can't get through. So, the shadows, the place where the straps are connected with skin and clothing, mask, hair, nose, chin.
3 Continue to render Ambient Occlusion of the mask and hair. As in the previous step, I must redraw only the parts where there is no light, or where there is very little light applied.
4 and 5 End of rendering of Ambient Occlusion, the lower part of the pilot's clothing and gloves. Often in these steps change the background from white to black, and the gradient, so I tried to feel the shape of the model by drawing on different backgrounds. For the first time, I'm bite a complicated object, but you can start with basic shapes and should stick to the same principle: "Where the light does not go" generally.
6 At this point I added the basic values of the background, just so I'd set up in the area and had a relationship with materialization, and began to render the metal mask. During the first five steps I came to the decision that the mask is brushed metal, worn, scratched and dented, and has opaque visor, which is inside the camera and transmits all information in the interface inside. I also decided to get her two connection slots in the pilot suit, the computer interface and the life support system. My opinion is that, while designing, we should pay attention to its convenience, and attachment to the world in which the object is located. As is the case with the mask, underwent a lot of things with this character. The story is as important as the work itself.
7 Continues rendering and execution. I finished the basic drawing belts, hair added volume and put basic strands, and continued with the materialization and detailing on the helmet. When detailing, I look at the amount of damage and reflections of lights in the room on the metal.
8 I have decided that the lower part is leather, and in this step, I drew the bottom of the outfit. After I drew the value I added slightly more convincing sense of texture for the sake of material. When all these drawing and materialization, basic Ambient Occlusion layer is placed above all else, and Blending is set to Multiply.
9 and 10 Plotting and materializationof the upper part of the equipment and gloves, arranging lights in some places. I'm also adding interesting and final background, which is part of the whole story about the character you draw. I decided to puther under the spotlights of aircraft hangar. I worked blurry on it from the beginning, because I wanted to focus on a character, but for background to serve the story.
11.Coloring. As for this part, I used several layers with different blending options. Mainly Multiply, Color, Overlay and Soft Light. I was experimenting with the colors until I came to a satisfying result.
12 At this point I started to work on the skin, which is the hardest part. I fixed the anatomy, light, background and reflective light, face, lips, and adding more details where i saw lacking.
13 Hair, skin. It usually takes a lot of time and practice to hit the "flow" of hair, and the patience to draw individual strands. I also worked on a small color corrections and skin colors.
14 Continues rendering individual strands. It takes a lot of work to make the hair look realistic. Basically you make bunch of layers with different colored strands that corresponds the hair's flow, experiment with opacity and colors, and work on it until you are satisfied. Still struggling with it!
15 Completed work! I ended up drawing the hair, and as the last stage, I used the Color Balance adjustment and Levels. I set not to fry white, and also of the burn too much darkest parts of the image. And that should be it for this work.
Hope it helps!
Adam "Skaven" Isailovic
