
Journals80
Newest
Bio Bay Collection
1 min read
Just uploaded a collection of my photos of the Jervis Bay bio-luminiscence over at Flickr. Have a look if you've got a minute  (Smile)")
Join the community to add your comment. Already a deviant? Log In
Post-Processing Processes
11 min read
So I thought I'd write a little about what I do to my photos once I'm back home. But before I explain that, it needs pointing out that I shoot in RAW because I want to make all the processing decisions instead of my camera. If you're unfamiliar with the format, RAW files are basically unembellished sensor data. When you shoot in JPEG your camera will make all sorts of decisions about saturation and light and they may or many not look satisfactory to you. So I, like many photographers with RAW-enabled cameras, take the camera's opinions out of the equation.

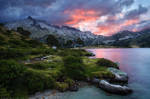
Only basic saturation boost to show off the sunlight.
In order to help me remember what a scene was like I fire off a couple of shots with my iPhone and I use these as a non-definitive reference for colour and lighting levels - it's just to jog my memory if you like. You could accomplish the same thing by just taking some JPEGs with your DSLR, but I like to leave those settings alone once I'm out and about.
The first time you import a series of RAW images, it can be a scary and/or surprising moment. The images are often washed out, flat looking and almost inevitably not much like the scene you photographed. This is because you now have to apply your own baseline settings.
So I used Lightroom 4 to process my images and Photoshop CS6 if they need further work. I import them directly through Lightroom and it applies a baseline preset I made, which applies automatic lens correction based on the EXIF data and bumps clarity and saturation up 50 and 10 points respectively. Then I scan through my photos and immediately reject the shitty, out of focus and otherwise terrible images. Then I do a second run-through and delete all the ones I was hesitant about deleting, because the truth is that I'm only interested in the good ones and there's no point hanging on to an image that not even you are sure about.
Now at this point I think it's worth mentioning my camera setup. I shoot pretty much all the time with a circular polariser on my camera and often a warming ND grad filter too. I love colourful images with plenty of saturation, but I don't want to go as far as the neon colours you get in many HDR images. I try and get as close as I can in the camera to my 'vision' but often than is not possible.

Color Efex Pro Polariser and Sunlight.
So every photo's different, but the first thing I ask myself is what the main problem with the photo is and I'll fix that first and then tweak everything else. For instance is the colour balance off or is it over-exposed? In Lightroom the Highlights slider is incredibly useful because it enables you to pull back the bright parts of your image by a couple of stops. Since I shoot almost exclusively at dawn and dusk that means I'm dealing with an incredible amount of contrast in an image, from the brightness of the sun to the unlit landscape. So pretty often I'll dial the highlights down about 50 or 60 points.
If you look at the histogram in Lightroom it shows you if there's some clipping going on at either end of the light spectrum. To sort those I use the White and Black sliders to dial up or down as required - this is the same as using a levels adjustment layer in Photoshop. Some people like soft images, some prefer sharp. I like crisp personally so I set clarity to 50 or 60.
Now it's time for colour. I always use vibrance first because it is a more subtle effect - I dial the slider up to the point where it looks right. If vibrance doesn't get close to the way the scene was originally coloured then I take vibrance back to zero and slowly turn up saturation. The saturation slider is a much more blunt tool than vibrance and it's very easy to over-do it. I hardly ever stray past 15 points of saturation.
So that's pretty much it from the Lightroom end of things. However some photos need a bit of work in Photoshop too. I shoot all of my landscape images with a super-wide 10-22mm lens and when that's at its widest there are large vignettes at each corner. There are two ways to fix them - firstly you can just crop in slightly - this is something I don't like to do because it negates the whole point of shooting at 10mm in the first place. So the second option is to repair those corners in Photoshop.
Photoshop's content-aware fill is a dream come true for this sort of blemish on an image. I drag a rough selection around all four corners covering the darkened areas and then I do a content-aware fill. 95% of the time no further work is required, but occasionally Photoshop will use a really obvious source for its fill and you'll get a clear repetition in the image. In that case I do it 'manually' with the patch tool.
So having done all that my image is usually looking great and that's when I'm done with it, but occasionally I'll want to do more work on it and that's when I call on the services of Color Efex Pro. I was put onto this by Atomic Zen 500px.com/AtomicZen an Australian photographer who takes gorgeous photos. The part of Color Efex Pro I use most is Tonal Contrast. This is an incredible way of sharpening an image without adding noise. Typically speaking I set it to 10,15,10,15 for the highlights, midtones, shadows and saturation sliders. I may also warm the image up using the Sunlight filter and darken the blue skies with the polariser.
So that's my workflow. About 50% of what I mention above is completely automated within Lightroom and then I tailor each image accordingly. Everyone has their own ways of getting the most out of their images.
Maxine's image is a split exposure montage.
For instance, I've noticed that more and more photographers are taking split exposure images and combining them in Photoshop. So they take a shot for the land and then a separate one for the sky and then mask one over the other in Photoshop. For instance the image above by MaximeCourty is actually two photographs - one for the land and one for the sky. I like this technique and I think it's infinitely preferable to HDRs which are very unsubtle. For me, 99% of my photos came from one RAW file.
There is definitely a line between a truthful image and a fantasy. For me I definitely like to stay on the side of truth because I see myself as a photographer and not a digital artist. My images are often very colourful, but that it is usually down to two things - the polarising filter on the camera and the fact that I live on the coast in Australia and sunsets here do tend to be pretty fucking colourful.
If you have any questions, just ask.
Only basic saturation boost to show off the sunlight.
In order to help me remember what a scene was like I fire off a couple of shots with my iPhone and I use these as a non-definitive reference for colour and lighting levels - it's just to jog my memory if you like. You could accomplish the same thing by just taking some JPEGs with your DSLR, but I like to leave those settings alone once I'm out and about.
The first time you import a series of RAW images, it can be a scary and/or surprising moment. The images are often washed out, flat looking and almost inevitably not much like the scene you photographed. This is because you now have to apply your own baseline settings.
So I used Lightroom 4 to process my images and Photoshop CS6 if they need further work. I import them directly through Lightroom and it applies a baseline preset I made, which applies automatic lens correction based on the EXIF data and bumps clarity and saturation up 50 and 10 points respectively. Then I scan through my photos and immediately reject the shitty, out of focus and otherwise terrible images. Then I do a second run-through and delete all the ones I was hesitant about deleting, because the truth is that I'm only interested in the good ones and there's no point hanging on to an image that not even you are sure about.
Now at this point I think it's worth mentioning my camera setup. I shoot pretty much all the time with a circular polariser on my camera and often a warming ND grad filter too. I love colourful images with plenty of saturation, but I don't want to go as far as the neon colours you get in many HDR images. I try and get as close as I can in the camera to my 'vision' but often than is not possible.
Color Efex Pro Polariser and Sunlight.
So every photo's different, but the first thing I ask myself is what the main problem with the photo is and I'll fix that first and then tweak everything else. For instance is the colour balance off or is it over-exposed? In Lightroom the Highlights slider is incredibly useful because it enables you to pull back the bright parts of your image by a couple of stops. Since I shoot almost exclusively at dawn and dusk that means I'm dealing with an incredible amount of contrast in an image, from the brightness of the sun to the unlit landscape. So pretty often I'll dial the highlights down about 50 or 60 points.
If you look at the histogram in Lightroom it shows you if there's some clipping going on at either end of the light spectrum. To sort those I use the White and Black sliders to dial up or down as required - this is the same as using a levels adjustment layer in Photoshop. Some people like soft images, some prefer sharp. I like crisp personally so I set clarity to 50 or 60.
Now it's time for colour. I always use vibrance first because it is a more subtle effect - I dial the slider up to the point where it looks right. If vibrance doesn't get close to the way the scene was originally coloured then I take vibrance back to zero and slowly turn up saturation. The saturation slider is a much more blunt tool than vibrance and it's very easy to over-do it. I hardly ever stray past 15 points of saturation.
So that's pretty much it from the Lightroom end of things. However some photos need a bit of work in Photoshop too. I shoot all of my landscape images with a super-wide 10-22mm lens and when that's at its widest there are large vignettes at each corner. There are two ways to fix them - firstly you can just crop in slightly - this is something I don't like to do because it negates the whole point of shooting at 10mm in the first place. So the second option is to repair those corners in Photoshop.
Photoshop's content-aware fill is a dream come true for this sort of blemish on an image. I drag a rough selection around all four corners covering the darkened areas and then I do a content-aware fill. 95% of the time no further work is required, but occasionally Photoshop will use a really obvious source for its fill and you'll get a clear repetition in the image. In that case I do it 'manually' with the patch tool.
So having done all that my image is usually looking great and that's when I'm done with it, but occasionally I'll want to do more work on it and that's when I call on the services of Color Efex Pro. I was put onto this by Atomic Zen 500px.com/AtomicZen an Australian photographer who takes gorgeous photos. The part of Color Efex Pro I use most is Tonal Contrast. This is an incredible way of sharpening an image without adding noise. Typically speaking I set it to 10,15,10,15 for the highlights, midtones, shadows and saturation sliders. I may also warm the image up using the Sunlight filter and darken the blue skies with the polariser.
So that's my workflow. About 50% of what I mention above is completely automated within Lightroom and then I tailor each image accordingly. Everyone has their own ways of getting the most out of their images.
Maxine's image is a split exposure montage.
For instance, I've noticed that more and more photographers are taking split exposure images and combining them in Photoshop. So they take a shot for the land and then a separate one for the sky and then mask one over the other in Photoshop. For instance the image above by MaximeCourty is actually two photographs - one for the land and one for the sky. I like this technique and I think it's infinitely preferable to HDRs which are very unsubtle. For me, 99% of my photos came from one RAW file.
There is definitely a line between a truthful image and a fantasy. For me I definitely like to stay on the side of truth because I see myself as a photographer and not a digital artist. My images are often very colourful, but that it is usually down to two things - the polarising filter on the camera and the fact that I live on the coast in Australia and sunsets here do tend to be pretty fucking colourful.
If you have any questions, just ask.
Join the community to add your comment. Already a deviant? Log In
Give the shutter button a rest!
5 min read
If I'm guilty of any of the usual crimes against photography, it's probably overshooting. If you get back from a location and you've nearly filled a 32Gb card with images then you're probably guilty of it too. I think there's a danger in this digital era, that we come to rely on chance supplying us with the right conditions to meet the settings we've dialled in to our cameras. And to compensate for that we repeatedly press the shutter button in the hope that one of our exposures will be correct.
So in an effort to stop myself from doing this, I ask myself some questions when I'm hunched over that viewfinder:
1) Has the light changed substantially since I last pressed the shutter button?
2) Have I moved to a significantly different location since I last pressed the shutter button?
3) Have I oriented the camera on a significantly different axis since I last pressed the shutter button?
4) Have I significantly changed the exposure, aperture or ISO settings since I last pressed the shutter button?
5) Am I already working out in my head how to 'fix' this image in Photoshop?
If the answer to some or all of these is a big 'no' then I take my finger off the shutter button and re-evaulate the scene.
Like all the rules of photography mine can and should be broken on occasion, but I think they're handy to keep in mind.
___________________
One of my favourite photographers here on DA is Dee-T - he produces some awesome landscape imagery. What I particularly like is that he keeps it very much on the realistic side rather than cranking the saturation up to 11 like a lot of photographers seem to be doing these days. Anyway - he's just back from a trip to New Zealand and created an epic YouTube video of the photos he took:
Join the community to add your comment. Already a deviant? Log In
The Global Photography Club
6 min read
I was talking to a good friend of mine that other day. She's a professional photographer (20 years in the business) and a published author and we were talking about the influences that surround us. It occurred to me then, more than it ever has before, that circumstances have changed drastically for photographers due to the Internet.
When I first started taking photos in my teenage years (the 1980s) the benchmark that I used to measure myself against was the local photography club. Sure there were books of photographs by famous photographers but they lived in the rarified stratosphere. So the pool of talent that I judged my efforts against were the 30-odd members of a club. Fast forward 20 years and the Internet has changed all that.
These days we judge ourselves and our photos against a global pool of photographers. We strive to do better by improving on the work of others we've seen online on sites like DeviantArt and 500px. The quality of photography on sites like 500px is pretty incredible and it can affect you in two ways - you can either decide you'll never be able to do any better and give up, or you strive to do better.
It's not just global competition of course, but also training and inspiration that we can now draw on from all across the globe. Astrophotography, macros and surf photography are three specialised areas that have received a lot of attention lately partly, I feel, because we get to see excellent examples of these kinds of photography on a daily basis being uploaded to sites like this. Whereas before we'd read books and get help from local photographers, now we can get help from online blogs, tutorials or shared information.
Combine all the above with the myriad advantages of digital photography over film photography and it means that photographic training gets condensed down into a much shorter space of time. Skills that might take years to perfect can now be honed in a much shorter time frame. These are exciting times.
______
In other news, one of my photos placed second in Phoozl's Art of Nature competition www.phoozl.com/phooznews/resul…. It was judged by Daniel Cox, a great professional photographer with two Nat Geo covers to his name. The photo in question was Sunset on Fire, of which Daniel had this to say.

"For the second place winner, the pelican and setting sun is also a very natural looking image. The intensity of the sky is stunning by itself, but that wouldn't be enough to win. It was the beautifully composed pelican that made all the elements of this image come together. Without that pelican it was just another gorgeous sunset. And, without an eye for composition, this image would not have gone as far as it did. It's just stunning from foreground to background with great elements of interest: the pelican, the colorful sky, and a background of additional roosting birds."
I am of course delighted to have placed so well in the competition and would like to thank Harald over at Phoozl and Dan Cox for judging.
When I first started taking photos in my teenage years (the 1980s) the benchmark that I used to measure myself against was the local photography club. Sure there were books of photographs by famous photographers but they lived in the rarified stratosphere. So the pool of talent that I judged my efforts against were the 30-odd members of a club. Fast forward 20 years and the Internet has changed all that.
These days we judge ourselves and our photos against a global pool of photographers. We strive to do better by improving on the work of others we've seen online on sites like DeviantArt and 500px. The quality of photography on sites like 500px is pretty incredible and it can affect you in two ways - you can either decide you'll never be able to do any better and give up, or you strive to do better.
It's not just global competition of course, but also training and inspiration that we can now draw on from all across the globe. Astrophotography, macros and surf photography are three specialised areas that have received a lot of attention lately partly, I feel, because we get to see excellent examples of these kinds of photography on a daily basis being uploaded to sites like this. Whereas before we'd read books and get help from local photographers, now we can get help from online blogs, tutorials or shared information.
Combine all the above with the myriad advantages of digital photography over film photography and it means that photographic training gets condensed down into a much shorter space of time. Skills that might take years to perfect can now be honed in a much shorter time frame. These are exciting times.
______
In other news, one of my photos placed second in Phoozl's Art of Nature competition www.phoozl.com/phooznews/resul…. It was judged by Daniel Cox, a great professional photographer with two Nat Geo covers to his name. The photo in question was Sunset on Fire, of which Daniel had this to say.
"For the second place winner, the pelican and setting sun is also a very natural looking image. The intensity of the sky is stunning by itself, but that wouldn't be enough to win. It was the beautifully composed pelican that made all the elements of this image come together. Without that pelican it was just another gorgeous sunset. And, without an eye for composition, this image would not have gone as far as it did. It's just stunning from foreground to background with great elements of interest: the pelican, the colorful sky, and a background of additional roosting birds."
I am of course delighted to have placed so well in the competition and would like to thank Harald over at Phoozl and Dan Cox for judging.
Join the community to add your comment. Already a deviant? Log In
Maximising Colour in Landscape Photos
8 min read
I'm pretty lucky to live where I do - on the Pacific eastern seaboard of Australia in the south of New South Wales. It's a largely unspoilt area with some amazing landscape and due to the low levels of pollution and built-up areas, the light can be amazing. In particular the sunsets in this part of the world are amazing - certainly for someone who was born in the UK and spent the first 40 years of their life under low cloud cover and drizzle.
But even with the great light here, there are ways to maximise the colour in your photograph, without turning them into over-saturated Fisher Price monstrosities. There's a line that some photographers have crossed that takes your photo from the realms of realism into a fantasy land of neon colours that just don't exist in nature. As colourful as some of the sunsets in my photos are - they are a pretty accurate depiction of what I witnessed when taking the photo.


So if you like capturing natural light in landscape photos the first thing you should buy is a circular polarising filter. Now you can pick these up on eBay for $50, but you'll be wasting your time. Why spend good money on expensive lenses only to shove some cheap piece of crap filter in front of it? It doesn't make sense. And while photography equipment does generally cost a lot of money it strikes me that you usually get what you pay for. In short, save up for a good polarising filter - Lee or Singh-Ray are best, B&W and Hoya HD next. Don't waste your money on Tiffen or Cokin or you'll end up with aberrations and colour cast on your photos. Polarising filters work best when they're at 90 degrees to the sun, but I usually simply rotate the filter until I get the effect I want. Sometimes I'll want to cut through the glare on some water to see the rocks underneath and sometimes I'll want the reflection to show.
Now that you have a good circular polariser, the next step is to shoot at the best times of the day which is of course, an hour or so after sunrise and an hour or so before sunset - the golden hour as photographers call it. During the golden hour the light is heavily diffused and, assuming there's not heavy cloud, lit up by the sun's golden rays too. There's nothing stopping you photographing at midday, but the sun will be overhead and shadows will be harsh.
When it comes to setting up your camera, it's highly advisable to shoot in RAW mode because you can work on the image in Lightroom or Photoshop to a far greater degree than you can with a JPEG file. For all the flexibility of RAW the main reason I prefer it is that I can create a custom white balance for every photo. The white balance determines the warmth or coolness of an image and while the built in settings (daylight, cloudy etc) are good, they're not always want your want. To get great clarity in your images, it's alway useful to shoot with a tripod because even at relatively speedy shutter speed in broad daylight, it's possible to get camera movement in an image.
When you import your photo into Lightroom or Photoshop, remember not to go crazy with the saturation and vibrance sliders. Try and think back to the scene as you experienced and use the RAW file settings to balance the image as accurately as possible. Of course all photographers allow themselves a bit of artistic licence and add some extra saturation to their images, but there is a point where it goes from natural to plastic. Personally speaking I don't take any super-saturated image seriously because I don't see the point of them. If you're going to over-saturate your image to the point where the pixels in your LCD display are screaming for mercy, then why not just put the camera away and use a 3D Render to create a scene instead?
So have fun. Experiment with different lenses and settings and enjoy photography, one of the best excuses to get outdoors.
But even with the great light here, there are ways to maximise the colour in your photograph, without turning them into over-saturated Fisher Price monstrosities. There's a line that some photographers have crossed that takes your photo from the realms of realism into a fantasy land of neon colours that just don't exist in nature. As colourful as some of the sunsets in my photos are - they are a pretty accurate depiction of what I witnessed when taking the photo.
So if you like capturing natural light in landscape photos the first thing you should buy is a circular polarising filter. Now you can pick these up on eBay for $50, but you'll be wasting your time. Why spend good money on expensive lenses only to shove some cheap piece of crap filter in front of it? It doesn't make sense. And while photography equipment does generally cost a lot of money it strikes me that you usually get what you pay for. In short, save up for a good polarising filter - Lee or Singh-Ray are best, B&W and Hoya HD next. Don't waste your money on Tiffen or Cokin or you'll end up with aberrations and colour cast on your photos. Polarising filters work best when they're at 90 degrees to the sun, but I usually simply rotate the filter until I get the effect I want. Sometimes I'll want to cut through the glare on some water to see the rocks underneath and sometimes I'll want the reflection to show.
Now that you have a good circular polariser, the next step is to shoot at the best times of the day which is of course, an hour or so after sunrise and an hour or so before sunset - the golden hour as photographers call it. During the golden hour the light is heavily diffused and, assuming there's not heavy cloud, lit up by the sun's golden rays too. There's nothing stopping you photographing at midday, but the sun will be overhead and shadows will be harsh.
When it comes to setting up your camera, it's highly advisable to shoot in RAW mode because you can work on the image in Lightroom or Photoshop to a far greater degree than you can with a JPEG file. For all the flexibility of RAW the main reason I prefer it is that I can create a custom white balance for every photo. The white balance determines the warmth or coolness of an image and while the built in settings (daylight, cloudy etc) are good, they're not always want your want. To get great clarity in your images, it's alway useful to shoot with a tripod because even at relatively speedy shutter speed in broad daylight, it's possible to get camera movement in an image.
When you import your photo into Lightroom or Photoshop, remember not to go crazy with the saturation and vibrance sliders. Try and think back to the scene as you experienced and use the RAW file settings to balance the image as accurately as possible. Of course all photographers allow themselves a bit of artistic licence and add some extra saturation to their images, but there is a point where it goes from natural to plastic. Personally speaking I don't take any super-saturated image seriously because I don't see the point of them. If you're going to over-saturate your image to the point where the pixels in your LCD display are screaming for mercy, then why not just put the camera away and use a 3D Render to create a scene instead?
So have fun. Experiment with different lenses and settings and enjoy photography, one of the best excuses to get outdoors.
Join the community to add your comment. Already a deviant? Log In
Featured
Bio Bay Collection by andyhutchinson, journal
Bio Bay Collection
Just uploaded a collection of my photos of the Jervis Bay bio-luminiscence over at Flickr. Have a look if you've got a minute :)
Post-Processing Processes by andyhutchinson, journal
Post-Processing Processes
So I thought I'd write a little about what I do to my photos once I'm back home. But before I explain that, it needs pointing out that I shoot in RAW because I want to make all the processing decisions instead of my camera. If you're unfamiliar with the format, RAW files are basically unembellished sensor data. When you shoot in JPEG your camera will make all sorts of decisions about saturation and light and they may or many not look satisfactory to you. So I, like many photographers with RAW-enabled cameras, take the camera's opinions out of the equation.
:thumb325572984:
Only basic saturation boost to show off the sunlight.
In order to h
Give the shutter button a rest! by andyhutchinson, journal
Give the shutter button a rest!
If I'm guilty of any of the usual crimes against photography, it's probably overshooting. If you get back from a location and you've nearly filled a 32Gb card with images then you're probably guilty of it too. I think there's a danger in this digital era, that we come to rely on chance supplying us with the right conditions to meet the settings we've dialled in to our cameras. And to compensate for that we repeatedly press the shutter button in the hope that one of our exposures will be correct.
So in an effort to stop myself from doing this, I ask myself some questions when I'm hunched over that viewfinder:
1) Has the light changed substan
The Global Photography Club by andyhutchinson, journal
The Global Photography Club
I was talking to a good friend of mine that other day. She's a professional photographer (20 years in the business) and a published author and we were talking about the influences that surround us. It occurred to me then, more than it ever has before, that circumstances have changed drastically for photographers due to the Internet.
When I first started taking photos in my teenage years (the 1980s) the benchmark that I used to measure myself against was the local photography club. Sure there were books of photographs by famous photographers but they lived in the rarified stratosphere. So the pool of talent that I judged my efforts against we
Maximising Colour in Landscape Photos by andyhutchinson, journal
Maximising Colour in Landscape Photos
I'm pretty lucky to live where I do - on the Pacific eastern seaboard of Australia in the south of New South Wales. It's a largely unspoilt area with some amazing landscape and due to the low levels of pollution and built-up areas, the light can be amazing. In particular the sunsets in this part of the world are amazing - certainly for someone who was born in the UK and spent the first 40 years of their life under low cloud cover and drizzle.
But even with the great light here, there are ways to maximise the colour in your photograph, without turning them into over-saturated Fisher Price monstrosities. There's a line that some photographers