ShopDreamUp AI ArtDreamUp
Deviation Actions
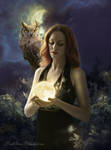
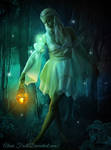
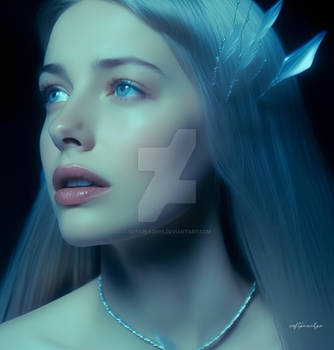
Alright! Who's ready to create super awesome super easy lighting and glow effects!?
The most important thing to remember with lighting and glowing is that it only works in the dark.
To quote Canadian artist Ed Martinyuk, you need "light to show dark, and dark to show light" ^^
The most important thing to remember with lighting and glowing is that it only works in the dark.
To quote Canadian artist Ed Martinyuk, you need "light to show dark, and dark to show light" ^^
Also I have found that color contrast always helps to define just where the light gathers. Blue and pink is one of
my combinations, which I will use in this artwork, but you can see some of the other combos I use in my art below.


What you'll need:
(1)Photoshop (Or some other image manipulation program)
(2)Stock 7 listed below (Or a similar light stock/brush)
(3)And you have to know how to use clipping masks. (if not, then check this tutorial here: Manip Academy #11: Clarifying Clipping Masks)
(4) Your ever-handy Gradient tool
Here are the stocks I've used for this artwork. You can find the links here in the original artwork :Shattered Fairytale


Let's get started!
First I cut out the basic stocks and arrange them.
Make sure you're happy with the arrangement because it will be hard to move them once we start painting.
Make sure you're happy with the arrangement because it will be hard to move them once we start painting.

Next we create a light source.
I ake the light texture and set the blend mode to screen. This will be the light source.

Now we have to color the model.
I make two copies of the Model layer and color the top
layer blue. I used a color overlay effect, but you can color it in your favorite way.
(I also blurred the BG)
I make two copies of the Model layer and color the top
layer blue. I used a color overlay effect, but you can color it in your favorite way.
(I also blurred the BG)

I hide the top (blue) layer and color the bottom one pink.(See PSD)
Roughly the same color as the light source.
Roughly the same color as the light source.

Now I turn the top (blue) layer visible again and mask the parts where
the light should be so that the pink layer becomes visible underneath.
the light should be so that the pink layer becomes visible underneath.

Then I add a clipping mask to the 'Model Group'.
(Note: It's important to have all model layers in a single group so that you can mask all the model layers as one. See my PSD tutorial)
Use the gradient tool (Color to Transparent setting) to apply a black shadow to the model group. (Where it should be darker) Set it to Multiply or Darken blend mode.
You can use a soft round brush on a low opacity to paint in any more shadows.
I use the gradient tool to paint shadows on the corners of the Background as well to make it darker.
Remember, "Light to show dark and dark to show light."

Then I add a new layer set to "Normal" and paint white highlights where the light is strongest.
I also add a layer set to "Overlay" for where the light needs to be softer.
Use these layers to outline the hands, face, highlight the hair, dress etc...
(I also darkened the Background to make the light appear brighter)

With the 'Normal' layer, paint in some bold highlights on the hair (Again, only where the light hits strongest)

Here I added some ivy leaves in the background. I used the same technique as on the model.
Simply color the leaves (pink) and use the Gradient tool to apply shadows (on a clipping mask)^^
Simply color the leaves (pink) and use the Gradient tool to apply shadows (on a clipping mask)^^

Adding some light effects and textures always helps the light look more magical!
(Although I ended up erasing most of those bokeh, hehe )
)
(Although I ended up erasing most of those bokeh, hehe

I finally settled on stock (8) (See above) as a sparkle texture...
And done!!!

So, I hope you enjoyed this tutorial!
If anything is not clear, just let me
know, and ask away if you have any
questions!
Tell me what you would like to see
in my next tutorial. I appreciate any
ideas and suggestions!
And have an awesome day!

Check out my other tutorials!
Rebirth-- Step-by-step TutorialThis tutorial is dedicated to :icondrury-lane: who is very kind and supportive
of my art, and has a healthy enthusiasm for learning! I love that!
Welcome to my step-by step tutorial of my latest artwork: Rebirth
First, I will just say that there is no wrong or right way to start a manip.
No two of my manips have ever started the same way-- or achieved the exact result I thought they would. It's all just a matter of
what you want your artwork to look like.
It's a matter of starting with your subjects (I usually start with one or two of the most important stocks) and work your
way towards the effect you want. Try different stocks. Experiment! It's the only way to learn.
Let's get started!
(Remember that I was experimenting too. Some of my experiments were deleted from this tutorial, so
you wouldn't have to wade through useless photos. I am still a learner too, so my techniques may not be the most stellar
Tutorial-- Creating depth using blur

Hi! Everyone seemed to like this artwork, so I thought I'd make a tutorial on how you can create a beautiful photographic depth effect using Gaussian blur. It's so quick and so simple. You're going to love it!
(Not just for Photoshop. These techniques work in GIMP and many more!)
[Heart] [Rose] [Heart]
Original with credits here: Ruby
[Heart] [Rose] [Heart]
Let's get started. I cut out my model and some scenery and arrange it to my liking.
This looks like a big step from the last, but all I've done is add more scenery. And birds. I [Heart] birds.
Take your time with the arrangement. Color it to your liking as well ^^
This is the fun part. Simply apply Filter>Blur>Gaussian blur to the background scenery, and any o

Hollywood Glow Photoshop Tutorial

Book Covers Stolen
Attention!
UPDATE: Success! Fiverr has deleted the offending account. Thanks to everyone who reported and messaged the thief.
An artist on fiverr has been stealing my art from DeviantArt and passing it off as his own. He has removed the watermarks and the author names. Sadly, I have no immediateproof of copyrightfor these works. (careless, I know), so my only choice is to run a social media campaign against him so others don't make this mistake.
I'd really appreciate it if y'all could, report him, spread the word or sound off in his comment section. In the meantime, here's links to all the stolen artworks that I can recognize.
https://www
Tutorials by Alexis
A collection of the tutorials I have created so far. Just so everything can be in one spot. ^^ I will update this journal as I add new tutorials!
Down-loadable tutorials:
Journal tutorials:
Help me.
Can anyone help me?
Does anyone know how to fix Windows error 0x80070002 ?
It's preventing me from updating to the latest version of Windows 10 and Photoshop too. :(
I've already tried some solutions I found online and nothing has worked. I still can't update.
I'm thinking of getting a repair kit, but it's a lot of money, and I don't even know if it will work.
Please help?
Book Of Awesome-- Spring Feature!
Yay! Celebrating 1000 watchers, and the beginning of a new season!
I hope you guys enjoy this little feature :aww:
Check out some of my latest too!
And congrats to !tornadoeyesART (https://www.deviantart.com/tornadoeyesart) for her second DD!
You go girl! :la:
I hope you enjoryed these wonderful works! And have a happy spring
Featured in Groups


© 2016 - 2024 FrostAlexis
Comments75
Join the community to add your comment. Already a deviant? Log In
Wow! a lovely tutorial. I learnt some new things here! Especially how to effectively use the "overlay" mode as really an overlay! That was an eye opener. Thank you very much!