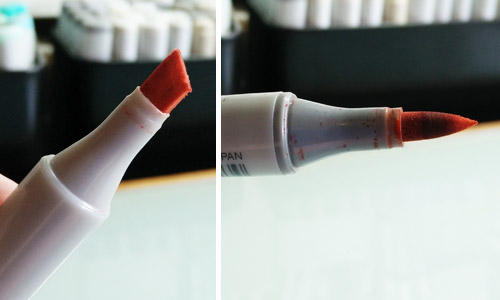
Introduction
After purchasing some Copic markers they can be a little intimidating on how to look after them. The ideas put forth in this article may also be useful for other brands of refillable markers, but always consult the product's webpage for tips and tricks on how to maintain them.
Firstly, these are the official resources: Downloadable Resources in PDF format or Copic AU FAQ which are the official methods for performing the tasks mentioned below.![]() Note: For best care of markers be careful when replacing and refilling as it is easy to damage markers further, try not to leave the nib removed for a prolonged period of time.
Note: For best care of markers be careful when replacing and refilling as it is easy to damage markers further, try not to leave the nib removed for a prolonged period of time.
Storing your Markers
When storing any markers ensure that that the caps are placed back on squarely on both ends of the marker correctly, try not to leave them too long with askew lids.
There are various products that can be purchased to store markers in, the order and organisation is of course up to the artists own preference. There are various sizes of plastic jewel cases to store the markers in an upright position, mini shelves with pigeon hole like slots to store the markers horizontally and various sized wallets that store the markers in little pockets that can be kept either upright or horizontally (and are portable).
The type of storage to use needs to suit the environment in which is available, however sitting in direct sunlight is discouraged.
This example jewel case has grooves in the bottom and only fits Sketch makers, the lid has an insert with the same grooves. Other jewel cases are also available for different marker types. The lid is very useful as a refill holder if not needed for portability.
A cheap alternative to the expensive storage 'solutions' is a CD/DVD storage box with hand made cardboard inserts to divide the markers into logical units, i.e. by specific colour (E, BV, R, etc), most used, marker type (Ciao, Sketch, Wide, etc). Small rectangular or square shaped pen holders are also very useful.
Refilling Markers
Signs that the ink is running outWhen the ink is running it it often becomes streaky and not enough ink will come out to blend properly. If the ink is coming out blotchy or 'sticky' that is often a result of a damaged nib (and likely also a dried out one).
Easiest method is to get the chisel side of the marker and run it across blank paper, if there are lines rather than a nice solid colour, refill the marker.
Other indications are different levels of ink in the nibs or 'streaky' chisel points like the following example.
If a marker continues to be used when it is drying out then it will run the risk of damaging the nibs as well.
Darker coloured markers are easiest to notice because their streaks become very apparent, lighter colours are harder to notice and require manual checking from time to time for commonly used markers.
Try not to remove nibs or attempt to refill in direct sunlight, as it may dry out the marker.
Amount to Refill The lines on the refill are known as 'cc's (cubic centimetres) and are used to gauge how much is needed to fill the marker. Best bet is to start with the smaller amount to avoid overfilling the marker. If the marker is only just starting to show signs of running out of ink, start with an even smaller amount.
Copic Ciaos take 1-1.5cc (~30-40 drops)
Copic Sketch 2cc (~50-70 drops)
Copic Marker 2-3cc (~50-90 drops)
Copic Wide 3-4cc
Refilling without taking the nib out (drip method)Mentioned in the official guides as the 'drip' method. Have a tissue handy as it will likely overfill at some point and drip down the outside. Take the chisel side of the marker and drip the ink onto the nib, wait for it to be absorbed and drip another drop on.
It takes longer to absorb the more 'full' the marker is, adding extra drops before it has absorbed it will just cause it to overflow on the outside of your marker. Having a tissue on hand allows for easier mop up.
Sometimes air bubbles start coming out as the ink is being absorbed, wait until the bubbles subside before continuing.
Refilling by taking the nib out (with or without the booster)Removing the nib can be difficult, if you have the Copic tweezers, use these at the bottom of the nib and pull directly out (rather than at an angle). Slender fingers without long fingernails may also be able to do remove nibs without the tweezers, caution is required when performing this step.
There is a booster tool with a needle attached to the top of the refill which is inserted directly into the marker, however you can also drip straight into the shaft (do this carefully as it can overflow just as easily as going directly on the nib and sometimes also gets air bubbles).
Try not leave the marker 'nib-less' for too long, it may dry out the insides.
Help! I over filled it!Overfilled markers are very obvious as when they are used as the ink forms a drop and can leave a nasty blotch on the artwork (grab a tissue to lessen the damage). Leaving a marker overfilled can lead to the nib completely drying out and becoming useless. Use a tissue to blot the nib, then attempt to use again, if the nib becomes drippy again, repeat until this no longer occurs. Unfortunately unless the blotchy drops are used as a background effect or part of the colouring using the tissue will still waste the removed ink.
Sometimes a newly purchased marker may start doing this from first use, blot out the excess ink with the tissue before use as if left alone it can dry out the nib (and the nibs become difficult to pull out too).
Replacing Nibs
Signs a nib is damaged The nib often becomes 'sticky' and leaves streaks across the paper, though these streaks are darker rather than the lighter streaks when the ink is drying out. Chisel tips often will show signs of wear by fraying a little and start to have soft edges. Often little crystals of marker will stick to the lid and underneath (removable with a little extra blender/suitable alcohol).
Sometimes it is desirable to have a sticky nib, it can lead to some interesting effects.
How to remove and replace Same idea as refilling by taking the nib out, either use the Copic tweezer and pull directly out (not at an angle) by grabbing the base or if necessary fingers are suitable (be careful of long finger nails that dig into the marker as it might damage it). The marker can also be refilled at this point, or just add a few drops if it is quite full to aid bedding in the new nib. Push the blank nib in slowly and carefully making sure the groove meets the base of the shaft, a very dry nib should slide in easily. It can stick out a little bit (especially the chisel sides as this is how to get better results from the airbrush system), but too much can run a risk of drying out the marker.
Firstly check the nib is damaged and sticky, like the one above, and attempt to remove the nib. If the nib isn't coming out try adding some ink to the bottom of the nib to make it less sticky, a tissue can help a really uncooperative nib (like the example above).
Don't have a new nib?A nib may be possible to recover if it has dried out by soaking it in a solution of 0 Blender (or a suitable coloured ink if preferred), however it is very difficult to get dried-out nibs out of their marker and often this solution doesn't work. Seal up the exposed marker by sticky-taping across the hole and around the lid as well. Leave the nib to soak overnight before reinserting it back into the marker.
Cleaning the Lid When replacing a nib (or trying to limp one through) check the lid of the marker to make sure none of that died out crusty-ink has been left behind. Use 0 Blender (or a cheaper alternative) to clean that out with a cotton swab.
Making new colours
Determining what is needed Determine what marker colour appears to be missing and not available. Often these are markers in between the available types or ones that are of a lighter shade of existing markers. Much like watercolours mixing inks together can yield interesting results.
Gather the refills of the colours required and optionally the 0 Blender, as it can be useful when creating markers, as it serves as 'white' to lighten the ink.
Amounts to fill Since the entire blank marker is empty it can hold more ink (as it needs to fill the nibs as well as the body). Approximate trial and error numbers used for sketch and regular markers found:
Copic Sketch ~3cc (~80-120 drops)
Copic Marker ~4cc (~100-150 drops)
These numbers are only from trial and error and account for shaky hands when filling and dripping down the outside of the marker.
Recipes Coming up with a 'recipe' is a bit of trial and error, it is easiest to use an empty refill marker to make the mix, but a clean shot glass and an eyedropper also does the trick. Use a cheap paintbrush to mix and sample the work until happy.
Some very simple recipes. Please feel free to share more in the comments!
YR200: 35 drops YR21, 25 drops YR30 and 70 drops 0 Blender
E700: 50 drops E70, 70 drops 0 Blender (this 5/7 ratio often is useful for making a lighter version of the lightest currently available)
E10: 45 drops E11, 3 drops E04, 70 0 Blender
E20: 45 drops E21, 10 drops E10, 55 drops 0 Blender
Can new ink be added into existing markers?
Yes, it is possible to do this. Overfilling risk is very high as it's almost impossible to tell how much ink is already in the marker, but it is a lot of fun. It does take quite some time to blend together - turn the marker often and shake it to aid in the mixing. This technique is useful for duplicates that are otherwise useless, and a tissue can always be used to remove some of the ink before adding in the newer colour.
Other Copic Products
There are a variety of other Copic branded products that are also either single-use or refillable. The SP branded Multiliners have replaceable nibs and replaceable ink cartridges, however they are size specific so be careful when ordering. In the example below, only the SP Multiliner is reusable, the other three are not designed to be.
Opaque WhiteAs shown above, the white ink product is called Copic Opaque White and is something that is very useful for doing post-highlights, but the tub can easily dry out (as the example has shown).
A nifty trick is to get some of the dried out white ink and place it into the lid or another surface, then using a small amount of water, bring it back to a more fluid consistency. Too much water makes the ink not stick to the paper as well, whilst not enough makes it streaky.
Do not put the water directly into the pot! this will cause it to crystallise and can turn into little rocks, which are stubborn and don't just nicely dissolve.
Trying to resolve the drying out issue is time consuming and likely will be frustrating when working on a larger piece.
Questions for the Reader:
- How do you like to store your markers?
- Have any recipes for creating a marker?
- What other Copic products do you use and maintain?
Gifs from: Bakuman


