ShopDreamUp AI ArtDreamUp
Deviation Actions


Suggested Deviants


Suggested Collections


You Might Like…


Featured in Groups


Description
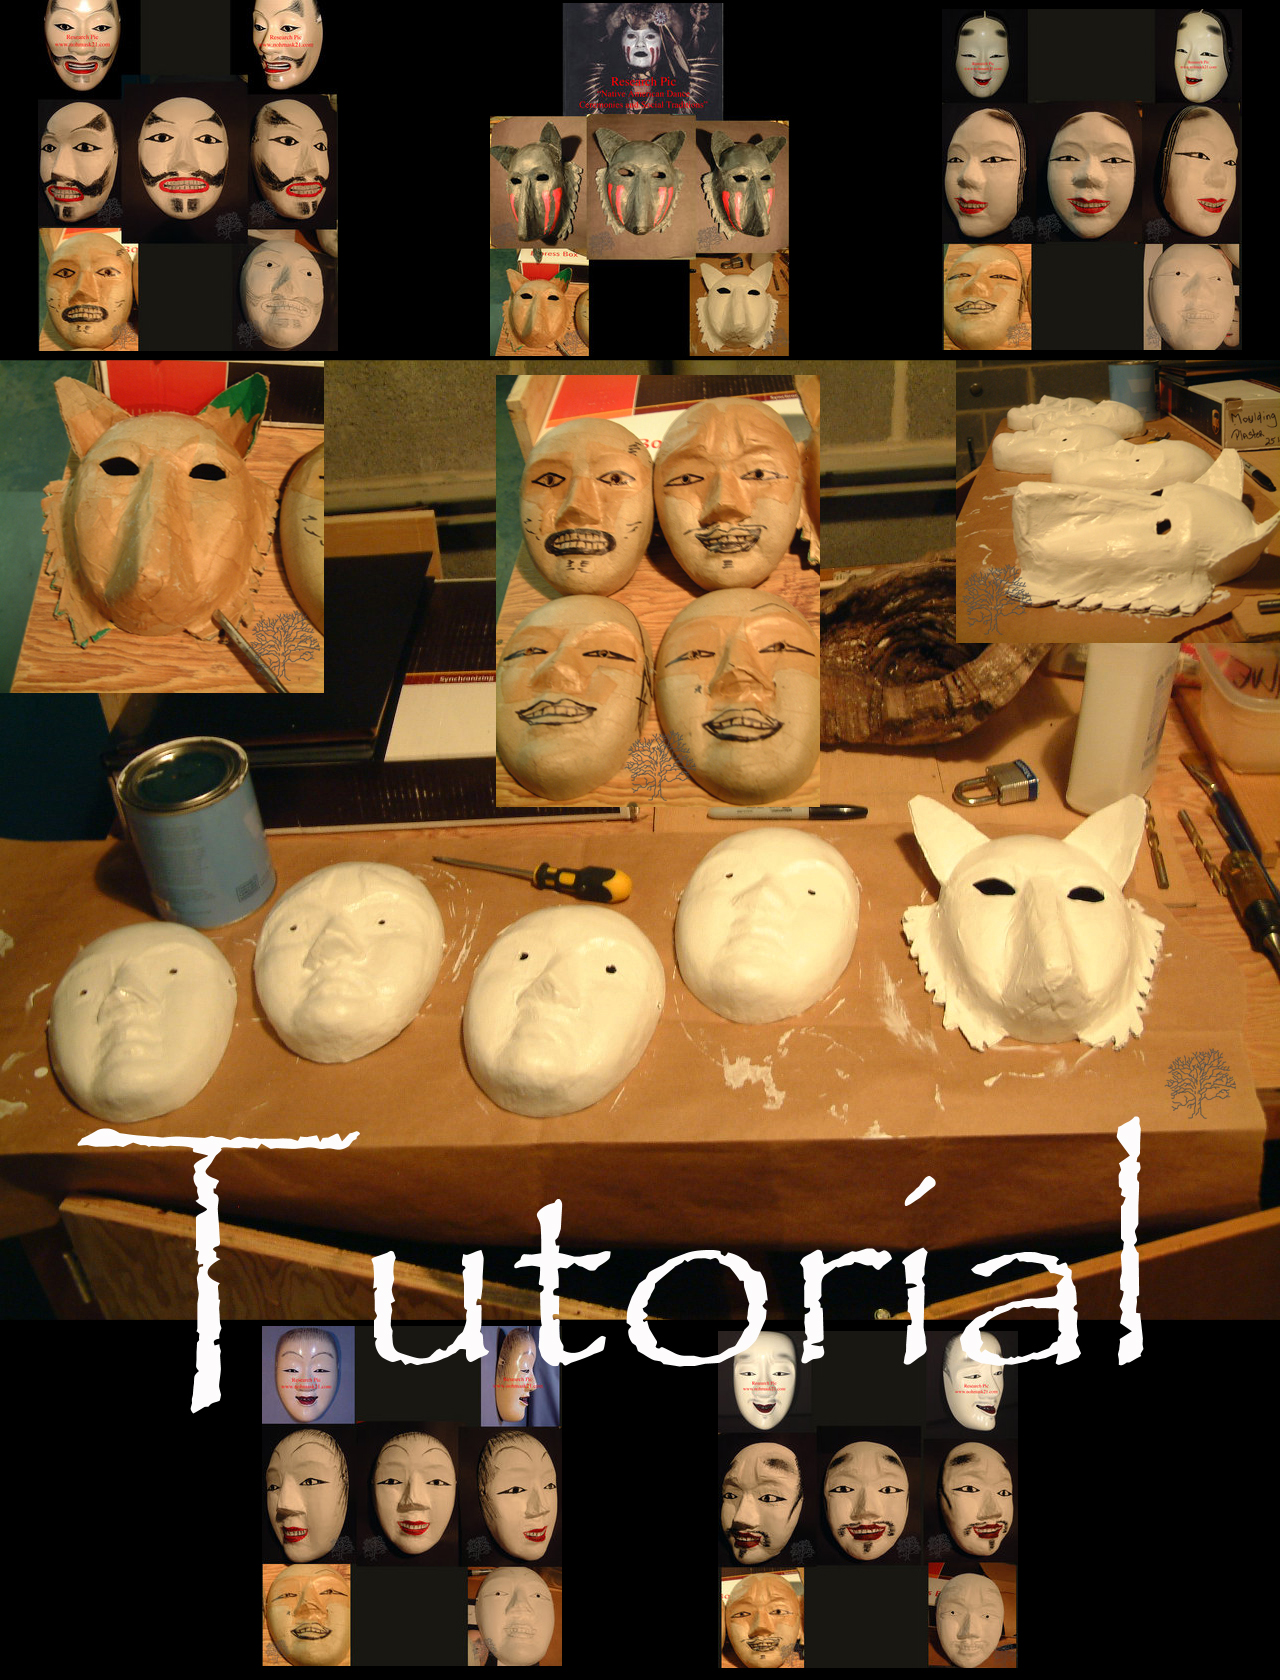
Mask Making
Paper and Fabric Mache
Creating the base layer:
I highly recommend buying a basic paper mask from an arts/crafts supply store. It saves a lot of time and leaves a lot more time for the creative parts!!
Also, I do recommend some time doing a full face casting of a friend – it’s a lot of fun, but it can be fairly frustrating too.
Supplies needed:
Plastic wrap
Flour
Water
Large bowl
Paper torn (not cut) into small strips – preferably heavy brown craft or paper bag paper
Food coloring
1. To do a face casting, pull back hair and place a thin layer of Vaseline over the skin and hairline areas. Place a layer of plastic wrap around the head to cover as much hair as possible. Make sure you cover your work area with spare paper, as the flour mixture does become a glue like paste!! And make sure the person getting cast is in a relaxed position, with their neck supported and the face level horizontally – they’ll be in this position a while, so make it as comfortable as possible.
2. In the large bowl, mix the flour and water at a ratio of one cup flour to one to three cups water. Starting with a cup of water in the bowl and adding additional water to the mixture as needed.
3. Begin taking strips of paper, torn not cut – tearing allows an edge that will blend with those around it making a cleaner flatter surface - and coating them with the flour water mixture. Slowly begin covering the larger areas of the face. Make sure you’re only doing a single layer of coverage. For the details – around the eyes, nose and mouth, it’s easier to tear the pieces of paper smaller. Allow the layer to dry completely. You’ll notice that the paper is dark when applied and becomes lighter in coloring as it dries – also the person being cast will feel it stiffening up.
4. Mix another batch of flour and water, this time dropping in a couple drops of food coloring. The color will be helpful in seeing the places that you’ve placed a second layer.
5. Continue repeating these steps until the mask is at least 6 layers thick, alternating color and non color between layers. Let dry completely.
6. When removing the mask, it is best done slowly and carefully (trust me the person being cast will appreciate it!!!) They should scrunch and stretch their face to loosen the mask from their skin.
7. At this point, clean up!! You’ve created a replica of your friend’s face!! Make sure when cleaning up that you don’t wash the flour and water mixture down a sink drain, just toss what you can in the trash – it will clog pipes!!
Additional surface details:
Creating additional surface details is great fun. Paints, markers, feathers, beads, you name it!! I advise putting a full coat of paint over all surfaces of a bought or made mask base, just to make it sweat and element proof. I also recommend sketching an outline of the design you want in pencil first – the curves and contours of the face can be tricky!
If the addition you want to make is more drastic, like an animal face, or exaggerated features, you can continue to build up the mask using the paper mache method from above, or you can use white craft glue instead, creating a stronger bond, or you can use masking tape, which is a whole lot quicker!!
For masks used in theater work, it is frequent to find that the masks are made with fabric mache, which is entirely similar to paper mache, but is done with thin gauze-like fabric like cheese cloth or muslin. Either the flour mixture or the white glue can be used for this. The masks will be stronger and will last much longer.
I highly recommend the book
The Prop Builder's Mask-Making Handbook by Thurston James [link]
It’s a bit advanced in sections but has great pictures and a lot of other methods.
---------------------------------------
oracletheatreinc@oracletheatreinc.com
[link]
sculpturalmyth@yahoo.com
[link]
Image size
1280x1680px 1.22 MB
© 2006 - 2024 shalonpalmer
Comments45
Join the community to add your comment. Already a deviant? Log In
I LOVE tutorials! Cool stuff!